Mopar Insiders Forum

Register a free account today to become a member! Once signed in, you'll be able to participate on this site by adding your own topics and posts, as well as connect with other members through your own private inbox!

The Yankee Express.

Joined
Sep 29, 2021
Messages
44
Reaction score
66
Location
Salisbury, Vermont
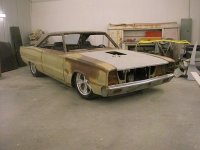
The Yankee Express is a 1967 Dodge Coronet 500 that has been heavily modified and customized. It's a one off car built for my own enjoyment.
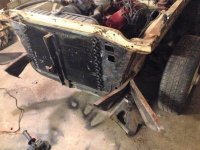
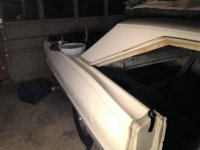
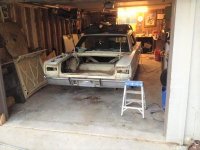
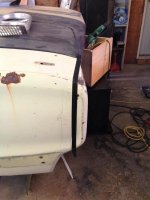
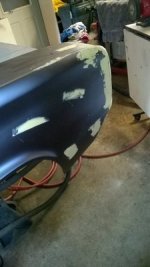
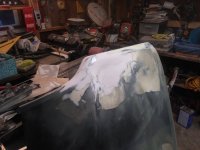
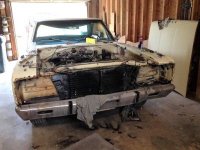
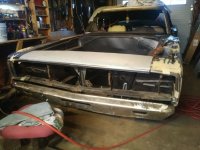
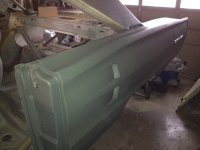
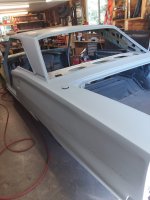
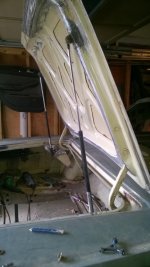
At present, November 2021, it is in primer ( 6 coats) with the front clip painted in body color.
The list of mods and fabrication is long and it's been in the garage since October 2014 with a brief period where I rolled it out onto the driveway in 2018 while testing my steering modifications.
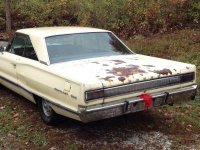
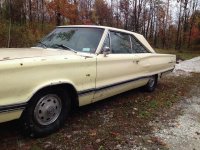
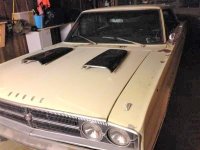
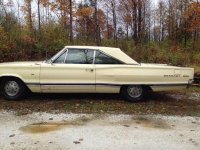
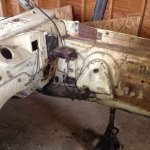
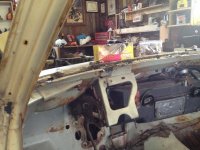
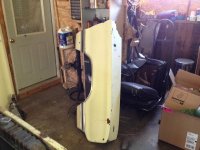
This car, when I purchased it, was a 100% complete example that was running and drivable. It had the factory wheel covers and cert-i-card intact.
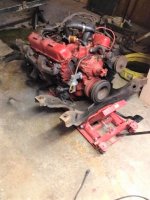
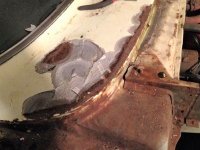
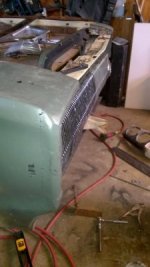
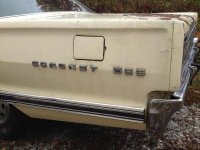
It's a 318 V8, A/C, tinted window glass, buddy seat, 3 spd column shift car with 69,000 original miles on it. Cream yellow color with black interior. Everything worked on it when I got it and the rust was minimal with three areas that had been smacked and repaired.
I paid $3750.00 for it.
Now for some back story:
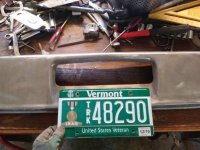
I'm 63 yrs old and spent 30 years in the US Army in combat aviation. I was medically retired from the service in 2015. I'm a combat veteran OIF/OEF and 100% disabled and unemployable.
Knowing that I was about to be retired at 57 years old I made plans to fulfill a life long dream of MOPAR muscle car ownership and building it the way I had dreamed about for decades. I simply never lived in one place long enough to have a reasonable expectation of being able to start and finish a project of this complexity.
I had NOT planned on being retired with TBI and PTSD however and this has made it exponentially more difficult to realize my dream. I'm not a quitter, fortunately.
Prior to purchasing the car I had a lot of ideas banging around in my head about what I wanted to do to it, but, the plan only really came together after I had the old girl home and trapped in the garage.
My pal Rick and I walked around the car and sat around spitballing this and that for mods that COULD be done.
After compiling a long list of crap we tried to filter it by keeping those that would look like the factory did it, and that would blend in so well that anyone who saw the car and knew what it was supposed to look like in stock form would be scratching their heads trying to figure out what had changed. They also had to be symmetrical and not stick out like a sore thumb.
So, here's what I did to it.


Mods:
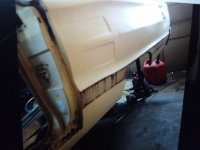
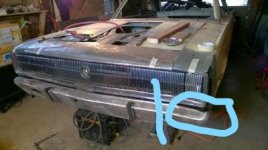
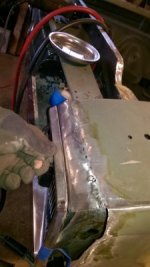
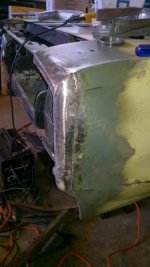
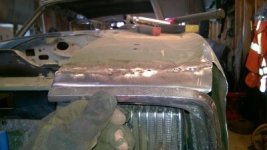
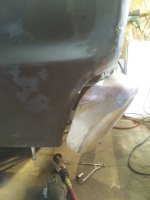
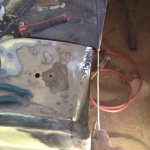
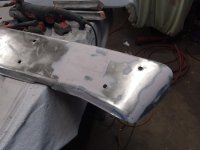
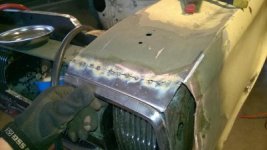
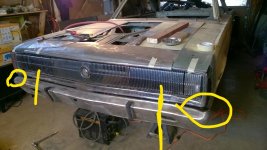
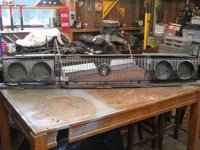
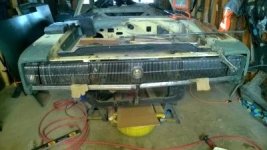
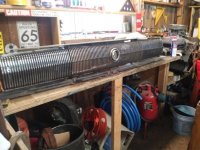
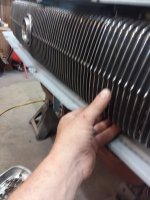
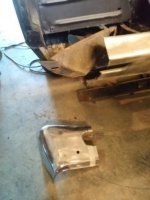
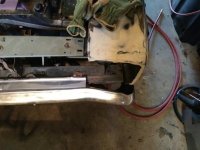
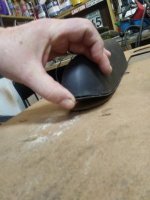
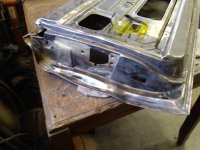
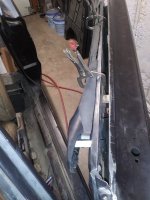
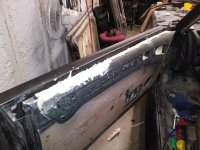
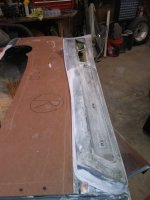
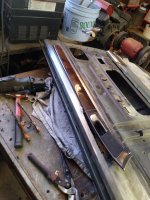
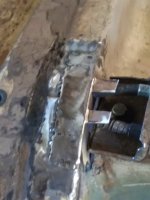
Front to back------ Front bumper sectioned, shortened, turn signal rectangular holes filled, recurved to fit the new fender noses and to hug the sheet metal. Also enlarged the center license plate cut out into a ram airduct.
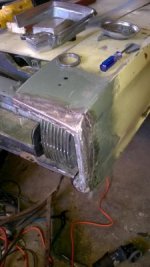
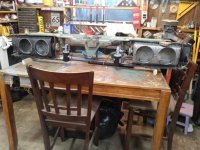
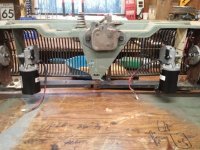
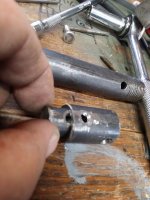
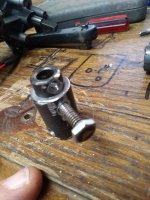
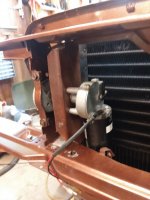
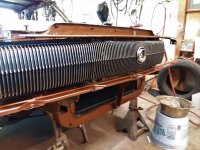
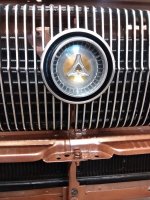
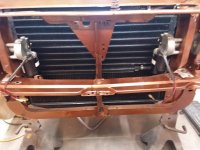
1967 Charger grill and revolving headlights. Custom electric headlight motors, mounts and linkages.
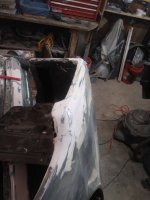
Front fender noses swept back to a 90* angle ( Think 70 Road Runner).
Front disc brakes swap from a 76 Aspen.
All rubber bumpers and bearings replaced.
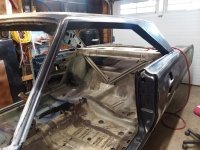
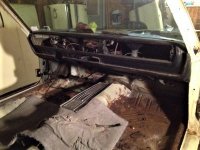
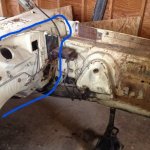
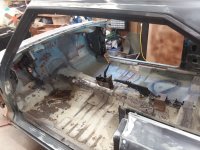
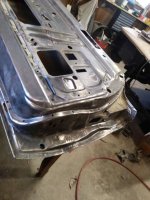
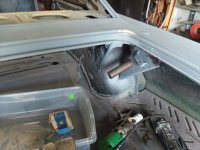
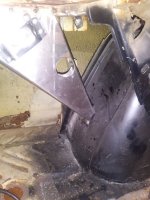
Inner fender close out smooth panels to hide wiring etc.
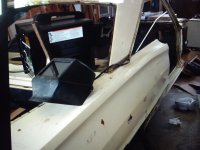
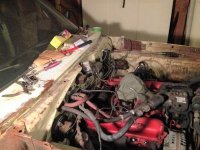
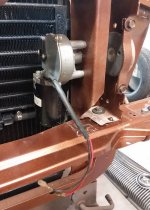
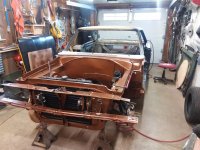
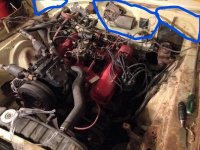
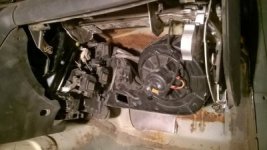
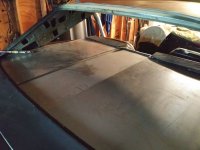
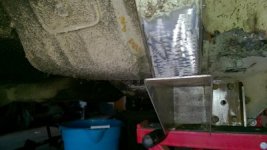
Smooth firewall with relocated wiper motor to under dash as is everything previously on the firewall.
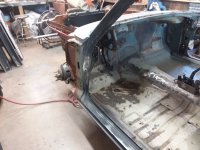
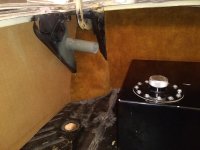
Battery to box behind passenger seat.
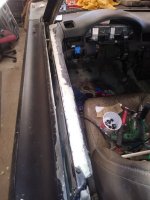
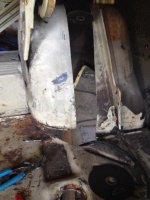
Wiring pass through tubes running along outside of inner fender just below the fender mounting flanges and into the cab through the firewall.
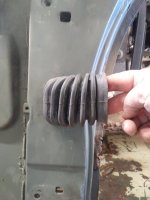
Wiring passthrough boots in the door frames.
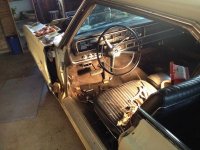
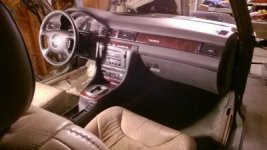
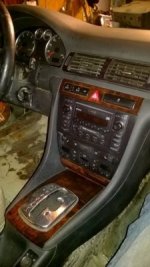
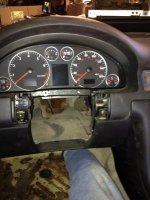
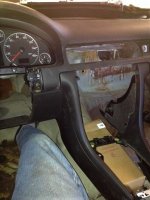
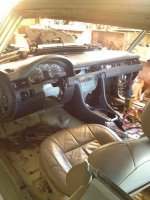
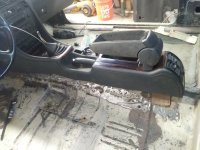
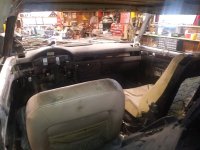
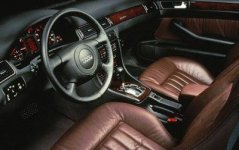
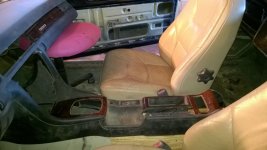
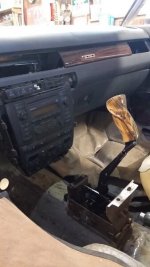
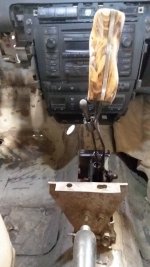
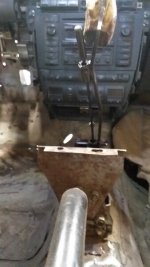
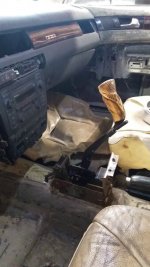
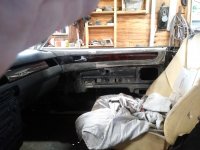
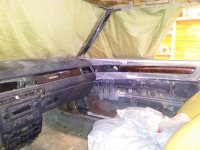
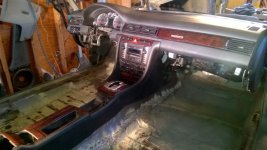
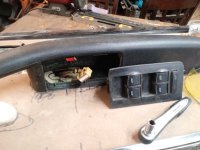
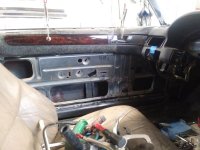
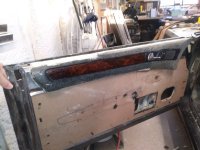
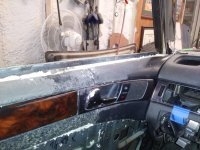
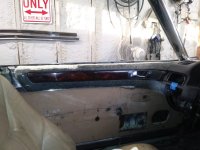
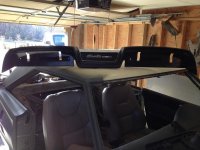
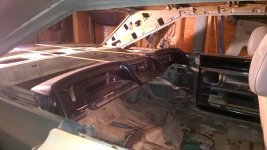
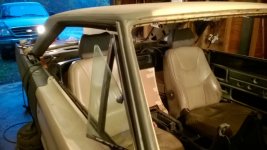
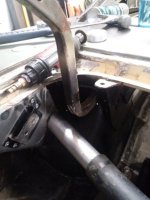
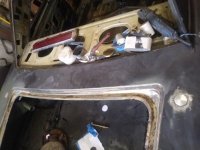
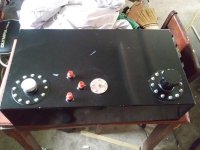
2004 Audi A6 Quattro dash/console /steering and center pull E Brake. And everything in/on the dash console too.
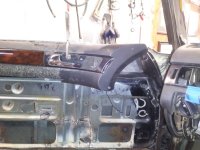
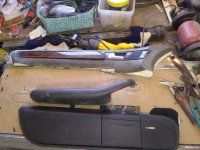
Audi door panel elements fabricated into new panels that align with the Audi dash.
Puddle lights and rear facing marker lights on the rear face of the inner door surface, so it can be seen when the door is opened.
Power everything.
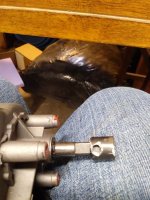
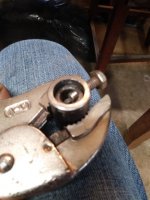
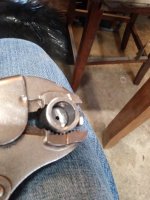
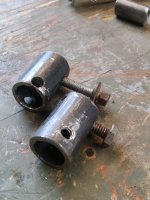
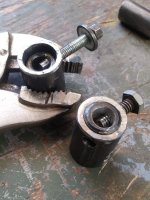
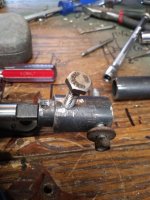
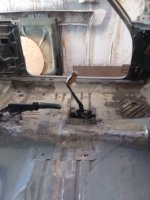
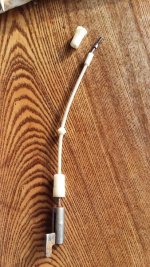
Custom steering linkages.
dual M/C and new hoses/lines.
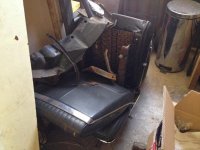
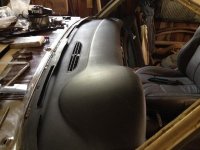
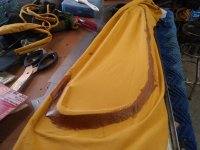
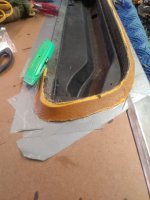
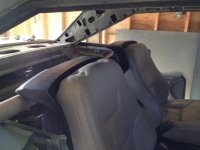
10 way, power/heated bucket seats leather.
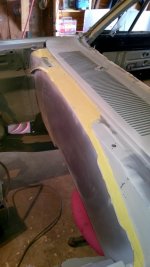
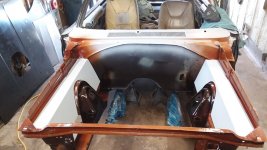
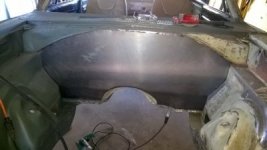
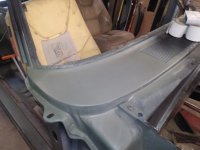
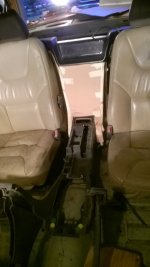
1967 Plymouth Sport Fury rear seat topper mounted just behind bucket seat tops and close out roadster type panels from there to the back glass. (Think 59 Corvette)
Audi armrest with 4 analog gauges hidden inside.
GPS speedo
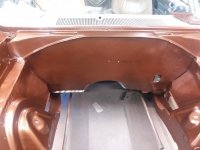
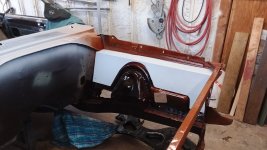
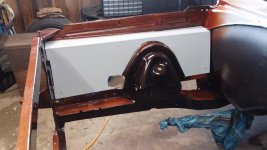
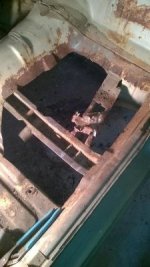
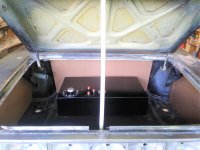
spare tire under the roadster panels in what would have been the center of the rear seat. Close out panel between cab and trunk.
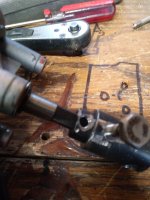
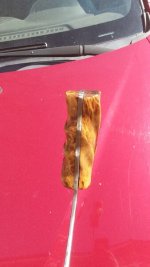
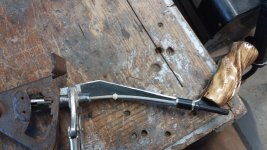
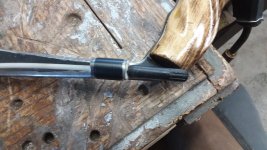
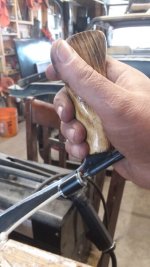
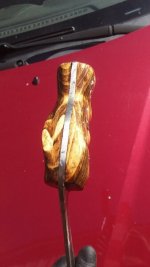
Fabricated shift linkage and lever. Hand made pistol grip and reverse lock out.
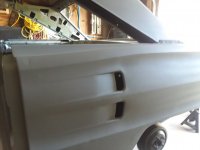
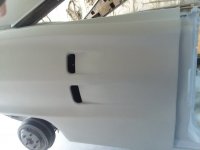
Fake quarter panel side scoops opened up.
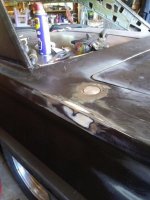
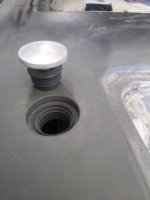
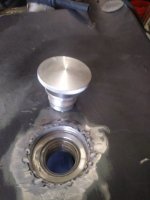
dual motorcycle pop up gas filler caps, one on top of each quarter near the trunk lid front corners.
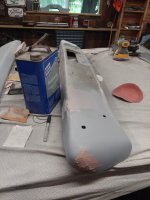
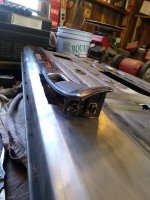
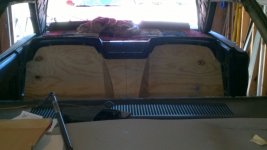
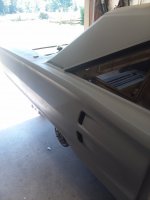
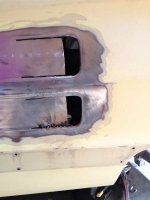
fabricate the entire rear face of the car to accept 1966 Thunder Bird tail lights.
Trunk lid on gas lifts
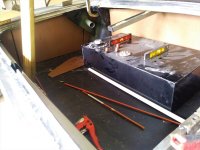
17 gallon fuel cell with dual filler necks.
trunk close out panels
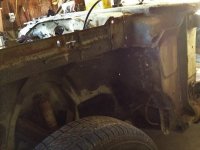
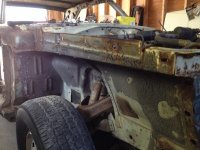
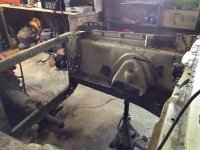
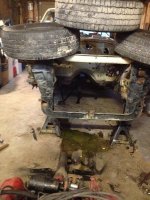
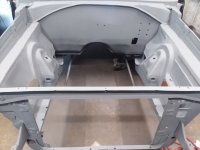
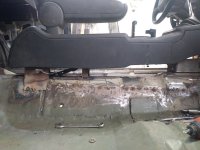
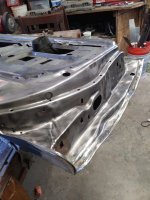
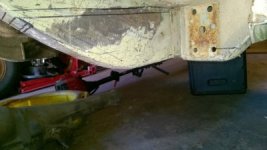
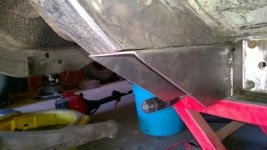
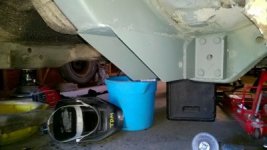
rear wells tubbed
leaf springs relocated to under the frame rails.
center pull E Brake cables
move spring perches
remove spare tire well
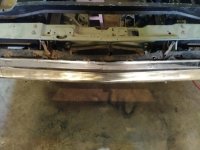
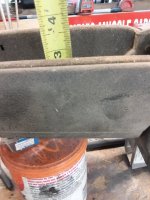
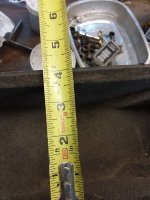
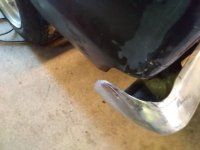
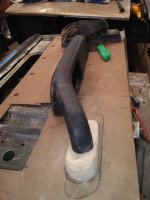
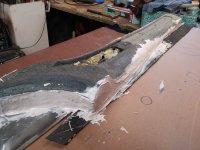
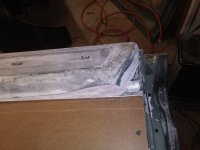
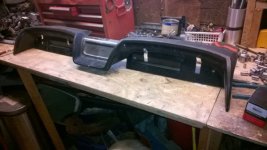
1970 Road Runner rear bumper lengthened 4 5/8" and recurved to hug the sheet metal. TTI exhaust to exit through those back up light holes.
Remote trunk release.
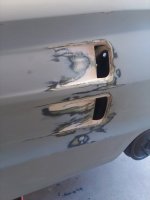
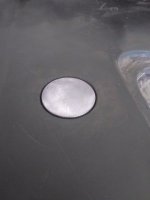
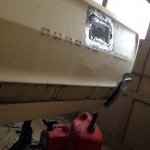
'shave gas filler door
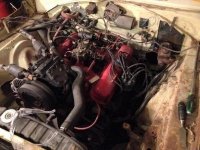
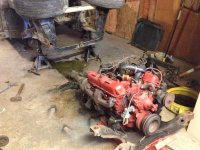
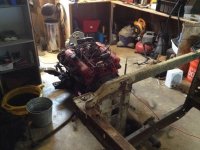
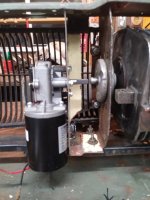
ditch the 318 in favor of a built 440 Magnum, and build a 727.

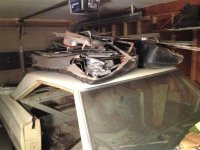
All of these mods have been completed.
Ambitious, I know...that's why it's been under construction since 2014. I had planned on being able to hold a job while building it so that there would be a budget. But, alas, that has not transpired and even more money has gone towards other needs. So, this has been done on no budget in a single space garage bay with simple hand tools. Truly. By me, without assistance. The only part that got farmed out was the motor machine work which went to RPM Racing Engines in Georgia, VT.

So that's the story, pictures and commentary to follow.... thanks for reading.. Ghost.
 
Joined
Sep 29, 2021
Messages
44
Reaction score
66
Location
Salisbury, Vermont
Here's some snaps of it after driving it off of the trailer at home, and in the garage on day one. Rick sat those 340 Duster scoops on the hood for grins and giggles. They didn't make the cut though...lol. We trailered it back to VT from way up in NY state by the St Lawrence Sea Way. These pics are at Ricks house since it was his trailer. I drove it home from there several miles, and into the garage.
 

Attachments

  • 189373-16c94b770c67be1dfc50328d63cb3580.jpg
    189373-16c94b770c67be1dfc50328d63cb3580.jpg
    26.7 KB · Views: 0
  • 189375-d3cea5e8b707b073f383d394dd2eba03.jpg
    189375-d3cea5e8b707b073f383d394dd2eba03.jpg
    38.7 KB · Views: 0
  • 189376-12bfbea9ffd38dacf399e7d6cc219714.jpg
    189376-12bfbea9ffd38dacf399e7d6cc219714.jpg
    37.5 KB · Views: 1
  • The Express with a sborrowed set of 340 Duster scoops just to see what they looked liked...jpg
    The Express with a sborrowed set of 340 Duster scoops just to see what they looked liked...jpg
    56.6 KB · Views: 1
  • fresh off the trailer, day one.jpg
    fresh off the trailer, day one.jpg
    39.2 KB · Views: 1
Joined
Sep 29, 2021
Messages
44
Reaction score
66
Location
Salisbury, Vermont
There were several things straight away that I didn't care for about the car. The way the front fender noses angled forwards so that the hood contour lines could flow onto them, the fake side scoops, the tail light set up, the side trim, the wheel covers, the under powered 318 V8, column shift, the lack of space in the wheel wells for wide tires, drum brakes, the buddy seat, the bare bones dash and the gas tank fill door on the side of the quarter panel. From this list was born the modification list since changing all of this engendered more ideas for changes.
After deciding on the list I began the disassembly of the car. These changes would mean stripping the car down to a bare shell. All of the many bits and pieces would be bagged and tagged, stored away for later use, customization or restoration. I made another list of the items that I would not need on the finished project. These were sold off to help with the build budget. 67 Coronet parts are expensive and difficult to locate. If it was a 1968 and up model the parts are plentiful. 67 and down are like hens teeth. I ended up with multiple buyers for every part.
I had several offers to help tear it apart but I declined all of them as I wanted to become intimately familiar with this car as I would be the one putting it back together.
 

Attachments

  • 1967 Coronet dissassembly.jpg
    1967 Coronet dissassembly.jpg
    24 KB · Views: 0
  • 318 V 8.jpg
    318 V 8.jpg
    73.5 KB · Views: 0
  • 318 pulled out with the K frame.jpg
    318 pulled out with the K frame.jpg
    70.4 KB · Views: 0
  • 170530-e01fd794792eb6978fb0bed12dd8cfba.jpg
    170530-e01fd794792eb6978fb0bed12dd8cfba.jpg
    24.3 KB · Views: 0
  • 171429-ec9d33fd4110ae606727597c5c6d3b2e.jpg
    171429-ec9d33fd4110ae606727597c5c6d3b2e.jpg
    65.7 KB · Views: 0
  • 171442-ed05e0acf0d372dbccda3dc08fa3a247.jpg
    171442-ed05e0acf0d372dbccda3dc08fa3a247.jpg
    67 KB · Views: 0
  • 171443-503482a36c09011c512ee07f460a79fe.jpg
    171443-503482a36c09011c512ee07f460a79fe.jpg
    60.1 KB · Views: 0
  • 171452-ab38152a50889d2c832db1d7e0a9829b.jpg
    171452-ab38152a50889d2c832db1d7e0a9829b.jpg
    53.2 KB · Views: 0
  • 171451-1c61b1c017f53fa5626d0f5e8a15d888.jpg
    171451-1c61b1c017f53fa5626d0f5e8a15d888.jpg
    30.5 KB · Views: 0
  • 171446-a00dafd2382af68c60a358841ec448fe.jpg
    171446-a00dafd2382af68c60a358841ec448fe.jpg
    61.9 KB · Views: 0
  • 171444-75136fb03f13aa47165f59a680de2557.jpg
    171444-75136fb03f13aa47165f59a680de2557.jpg
    44 KB · Views: 0
  • 171453-f5f9cbb2c6406f57957db4191171bb1b.jpg
    171453-f5f9cbb2c6406f57957db4191171bb1b.jpg
    29.7 KB · Views: 0
  • 174739-d4f4c38dd29a13aa7a262db8df0aa75a.jpg
    174739-d4f4c38dd29a13aa7a262db8df0aa75a.jpg
    30.2 KB · Views: 0
  • 174740-72cf02bcd039989c41c3d3a8b2acc442.jpg
    174740-72cf02bcd039989c41c3d3a8b2acc442.jpg
    64.9 KB · Views: 0
  • 20210904_113232.jpg
    20210904_113232.jpg
    463.7 KB · Views: 0
Joined
Sep 29, 2021
Messages
44
Reaction score
66
Location
Salisbury, Vermont
More disassembly...
 

Attachments

  • 20210904_113232.jpg
    20210904_113232.jpg
    463.7 KB · Views: 0
  • 20210904_113239.jpg
    20210904_113239.jpg
    442.3 KB · Views: 0
  • 20210904_113244.jpg
    20210904_113244.jpg
    386.4 KB · Views: 0
  • 20210925_160841.jpg
    20210925_160841.jpg
    578.6 KB · Views: 0
  • 20210925_160903.jpg
    20210925_160903.jpg
    343.2 KB · Views: 0
  • 20210925_160917.jpg
    20210925_160917.jpg
    267.4 KB · Views: 0
  • first days of deconstruction.jpg
    first days of deconstruction.jpg
    60.4 KB · Views: 0
  • doors.jpg
    doors.jpg
    29.6 KB · Views: 0
  • day 2 of deconstruction.jpg
    day 2 of deconstruction.jpg
    64.5 KB · Views: 0
  • holding the front end down with three wheels and tires.jpg
    holding the front end down with three wheels and tires.jpg
    34.1 KB · Views: 0
  • original interior.jpg
    original interior.jpg
    32 KB · Views: 0
  • pulling the 318 small block.jpg
    pulling the 318 small block.jpg
    68.4 KB · Views: 0
  • pulling the dash.jpg
    pulling the dash.jpg
    64.2 KB · Views: 0
  • right fender & seats.jpg
    right fender & seats.jpg
    26.7 KB · Views: 0
Joined
Sep 29, 2021
Messages
44
Reaction score
66
Location
Salisbury, Vermont
To tell this story I'll start at the front of the car and work my way to the rear. So, accordingly, the front bumper is first up.
To complete the change to 67 Charger grill and headlight buckets the front bumper would need changing, or modifying. The Coronet bumper had the turn signals on the bumper, great rectangular lights. The Charger has them in housings/bezels at either end of the grill. About this time I ran across pics of another 67 'Net online that the owner had customized. It became the example I used to change mine.
The other mod that drove the bumper changes was the fender nose fabrication. Since they would now be a few inches rearward of stock the bumper ends were going to be hanging out in thin air. So the fender work needed to be done before the bumper work. Let's begin there....
The fenders angle out at a 45* angle from the front of the car. I hate it. The 1970 Road Runner however, I DID like. So, i decided to sweep those nod=se angles back to approximately 90*. Both fenders had been smacked at some point in the cars past so cutting out some of that damaged sheet metal was a bonus. I ended up having to sort of jigsaw the pieces together so that the curve along the top of the fender would look right and the contours on the fender sides would align together. I bought a chunk of used 67 fender for cutting up. Once that was complete I then had a landing location for the ends of the front bumper. The bumper was sliced into seven pieces. I needed to remove the curved sections to flatten out the back edge line and also reshape the ends. I trimmed the ends to exactly match the profile of the fender pockets. I filled the turn signal holes with new metal and welded them up. A little bodywork and Bob's yer Uncle. As an after thought I decided to widen and enlarge the center license plate holder cut out to act as an air dam. Here's a picture showing the amount that the fender nose was cut back and the stages of bumper modification...
 

Attachments

  • 67 Charger front end mock up_LI.jpg
    67 Charger front end mock up_LI.jpg
    254.1 KB · Views: 0
  • 214930-6d7990804951db91889f6a2bd019a62b.jpg
    214930-6d7990804951db91889f6a2bd019a62b.jpg
    55 KB · Views: 0
  • 232085-0f192b8da85a6b37d33a4b038d3ac2a2.jpg
    232085-0f192b8da85a6b37d33a4b038d3ac2a2.jpg
    20.4 KB · Views: 0
  • 236327-352033ea220144eb29bfb59178ff660a.jpg
    236327-352033ea220144eb29bfb59178ff660a.jpg
    21 KB · Views: 0
  • 431217-cc9bec9c702e4a2be7ec82f52f429f6e.jpg
    431217-cc9bec9c702e4a2be7ec82f52f429f6e.jpg
    19.5 KB · Views: 0
  • 431216-70fd241cc70923586e68ad9e596c9392.jpg
    431216-70fd241cc70923586e68ad9e596c9392.jpg
    18.9 KB · Views: 0
  • 245946-bae26c52ca2a1efc9e569ea8b0779fdf.jpg
    245946-bae26c52ca2a1efc9e569ea8b0779fdf.jpg
    20.8 KB · Views: 0
  • 245945-497b446464b140e383d71055a52a79de.jpg
    245945-497b446464b140e383d71055a52a79de.jpg
    22.3 KB · Views: 0
  • 236328-6da18c536c9eee7439e803bc6f3bdf6c.jpg
    236328-6da18c536c9eee7439e803bc6f3bdf6c.jpg
    21.9 KB · Views: 0
  • 438170-1abfde077265cc87cf50aecbc117b020.jpg
    438170-1abfde077265cc87cf50aecbc117b020.jpg
    21.1 KB · Views: 0
  • 20210730_102104.jpg
    20210730_102104.jpg
    349.3 KB · Views: 0
  • 1227191527a.jpg
    1227191527a.jpg
    67.5 KB · Views: 0
  • 1227191527.jpg
    1227191527.jpg
    45.2 KB · Views: 1
  • 1108181321.jpg
    1108181321.jpg
    33.1 KB · Views: 1
  • 1107181513.jpg
    1107181513.jpg
    69.5 KB · Views: 1
Joined
Sep 29, 2021
Messages
44
Reaction score
66
Location
Salisbury, Vermont
More of these
 

Attachments

  • day 2 of deconstruction.jpg
    day 2 of deconstruction.jpg
    64.5 KB · Views: 0
  • detail showing how much of the fender nose was removed and the new angle..jpg
    detail showing how much of the fender nose was removed and the new angle..jpg
    29.8 KB · Views: 0
  • front bumper center plate cut out enlarged and widened to serve as air scoop.jpg
    front bumper center plate cut out enlarged and widened to serve as air scoop.jpg
    29.5 KB · Views: 0
  • front bumper left end turn signal mount shaved and end sectioned & rebent.jpg
    front bumper left end turn signal mount shaved and end sectioned & rebent.jpg
    267.8 KB · Views: 0
  • nose surgery.jpg
    nose surgery.jpg
    21.5 KB · Views: 1
  • sectioned front bumper bodywork.jpg
    sectioned front bumper bodywork.jpg
    279 KB · Views: 1
  • WP_20160229_12_53_48_Pro_LI.jpg
    WP_20160229_12_53_48_Pro_LI.jpg
    708.2 KB · Views: 1
Joined
Sep 29, 2021
Messages
44
Reaction score
66
Location
Salisbury, Vermont
The 67 Charger grill and headlights are a much larger modification, along with the hardware there's wiring and fabrication as well. I disliked the 54 year old clunky headlight motors because they were...well, clunky and because rebuilt ones were expensive. I shopped around across the planet for electric motors that had the ummppff to turn the heavy buckets and were 12v and that had a three point mounting system to withstand the initial torque in turning the loaded buckets. I found a set out of China that met the bill. Fortunately the Coronet and the Charger share an identical front end, Mexico market models even came standard with the Charger front end installed. The only real difference is in the lower grill support bar because the trim is different. Easy mod in normal circumstances. Once I had the entire assembly mocked together on the benchtop I began the task of figuring out where and how to use those new motors.
Here's the thing....the OEM motors have a 'snout' that pokes through a 'donut' and connects directly to the buckets which serves to keep the center axis of the rotation in alignment and to connect the two together. My new motors had none of that. I had to also devise a method of keeping those buckets turning on a centered axis. The spacing between each section of the Charger front end is critical in order to end up with a dead straight line across the front when they are closed, and have equal spaces between everything. Once I had it set up correctly I sat around looking and thinking of ways to achieve my goals. I tried a few things that didn't work as well as I wanted them to before finally opting to use hard white nylon bushings. They could be sanded down for thickness and drilled out for ID while still retaining their shape and would stand up to use. I needed a set to hammer into the center of the 'donuts' that would corral the snout' post coming off of the bucket end, which would in turn keep them on a centered axis. Also I needed to have a spacer on the outer side of the mounting plate in order to keep the bucket face spaced correctly, left to right, so when assembled there would be no glaring miss spacing across the front when open or closed. In addition to all of that I needed to devise a way to connect the new motors to that drive post sticking though the 'donut' face. The motors have a 1/4" "D" shaped drive shaft and the bucket post end is a 5/8" post with a 3/16" hole through it for a set pin. lol.
I determined that I would need a set of steel tubes that slide within each other and have set screws to lock down against the 1/4" shaft flat section AND slide OVER the post with a hole for the set pin to go through both the tube and the post. In the pics i'm using clunky bolts to attach them together but when done i'll be using black oxide set screws. Unfortunately, due to constraints caused by lack of possible location surfaces for the motor mounting plates on the upper and lower grill support bars, I ended up with about 4" within which to make this connection happen. I also didn't have the skills and machinery to make the connection in a one piece tube. Hence the two pieces that slide within each other. The center portion of the two piece part would also need to be drilled and made ready for a set pin to slid through.
I had fun with making this part....lol. Another task was to position the motor body's so that they were "axis shaft centered" as well as angled so that they missed the lower support bar rear edge AND missed the front of the transmission cooler face behind them. A matter of fractions of an inch either way. Lot's of head scratching. The trim bolts right up, however, I had modified the fender noses and the "C" chrome end sections of the Charger grill trim were molded for the OEM fender nose shape. I trimmed the rear inside edge of each one so that they could be rotated rearwards while still aligning with the sections coming across the front and top. Here's the pictures....
 

Attachments

  • 12v electric motors placement mock up.jpg
    12v electric motors placement mock up.jpg
    32.5 KB · Views: 2
  • 232680-2437c2dfc62f41bebe811d3f1533c0e4.jpg
    232680-2437c2dfc62f41bebe811d3f1533c0e4.jpg
    58 KB · Views: 2
  • 67 Charger headlight assembly mock up with 12v motors.jpg
    67 Charger headlight assembly mock up with 12v motors.jpg
    34.7 KB · Views: 2
  • 67 Charger grill & headlights.jpg
    67 Charger grill & headlights.jpg
    32.2 KB · Views: 2
  • 799314-0377657439b1bb26f0a0db66a88c8403.jpg
    799314-0377657439b1bb26f0a0db66a88c8403.jpg
    33.5 KB · Views: 2
  • 20210824_152530(1).jpg
    20210824_152530(1).jpg
    353.3 KB · Views: 2
  • 1126191402.jpg
    1126191402.jpg
    54.5 KB · Views: 2
  • 1126191354.jpg
    1126191354.jpg
    65 KB · Views: 2
  • 1125191653.jpg
    1125191653.jpg
    50.2 KB · Views: 2
  • 20210828_112514.jpg
    20210828_112514.jpg
    77.1 KB · Views: 2
  • 1126191407.jpg
    1126191407.jpg
    45.8 KB · Views: 2
  • 1126191407a.jpg
    1126191407a.jpg
    50.4 KB · Views: 2
  • 1126191417a.jpg
    1126191417a.jpg
    51.7 KB · Views: 2
  • 1126191418.jpg
    1126191418.jpg
    64 KB · Views: 2
  • 1126191418a.jpg
    1126191418a.jpg
    50.6 KB · Views: 2
Last edited:
Joined
Sep 29, 2021
Messages
44
Reaction score
66
Location
Salisbury, Vermont
More on this...
 

Attachments

  • 20210825_124937 (2).jpg
    20210825_124937 (2).jpg
    481.8 KB · Views: 2
  • 20210825_124940.jpg
    20210825_124940.jpg
    320.6 KB · Views: 2
  • 20210826_144823.jpg
    20210826_144823.jpg
    488.9 KB · Views: 2
  • 20210826_144840.jpg
    20210826_144840.jpg
    508.3 KB · Views: 2
  • 20210904_113301.jpg
    20210904_113301.jpg
    472.8 KB · Views: 2
  • 1202191115a.jpg
    1202191115a.jpg
    54.6 KB · Views: 2
  • 1202191115.jpg
    1202191115.jpg
    56.8 KB · Views: 2
  • 1202181500.jpg
    1202181500.jpg
    78.9 KB · Views: 2
  • 1126191419.jpg
    1126191419.jpg
    52 KB · Views: 2
  • custom headlight motors installed.jpg
    custom headlight motors installed.jpg
    405.8 KB · Views: 2
  • handy nylon bushings.jpg
    handy nylon bushings.jpg
    20.9 KB · Views: 2
  • headlight bucket drive mock up.jpg
    headlight bucket drive mock up.jpg
    26.8 KB · Views: 2
  • spacer mock up.jpg
    spacer mock up.jpg
    24 KB · Views: 2
Joined
Sep 29, 2021
Messages
44
Reaction score
66
Location
Salisbury, Vermont
I'm months into this project and haven't progressed past the radiator yet! It's going to be a long road!
The car came with a 26" radiator so that was a bonus but the trans cooler was tiny. I bought a 1986 Dodge Power Ram pickup a few years later because I wanted the 440 Magnum engine the PO had installed in it. It had a large trans cooler on yet another 26" radiator, so I opted to use the bigger one. I shaved the fender top turn signal indicator mounting holes and the antenna hole too. Inside the engine bay the inner fenders were wrinkled a little from being smacked so i hammered them out some before determining that I either needed to replace them or hide them. Hiding them was easier so I did. I fabricated a set of close out panels .
Next on the hitlist was a smooth firewall.
In order to make this work I needed to relocate the washer motor from the top of the firewall to under the dash and then fill in the dent where it sits with new metal. While I was at it I sliced out the cowl end walls and welded in flat metal. They are wrinkled on every one of these cars and look like hell.
I cut out all portions of the stock firewall that protruded out past the baseline plane of the wall. Leaving the rest in place for strength purposes. I fabricated a one piece panel to slip into place and welded it up. Figuring out where to place the wiper motor was interesting too. It's always fun to blaze trails...
 

Attachments

  • WP_20161017_12_25_34_Pro.jpg
    WP_20161017_12_25_34_Pro.jpg
    101.2 KB · Views: 2
  • firewall and inners in color...jpg
    firewall and inners in color...jpg
    333 KB · Views: 2
  • front clip in grey primer.jpg
    front clip in grey primer.jpg
    267.4 KB · Views: 2
  • inner panels.jpg
    inner panels.jpg
    76.6 KB · Views: 2
  • left inner panel mock up.jpg
    left inner panel mock up.jpg
    75.1 KB · Views: 2
  • right inner fender close out panel mock up.jpg
    right inner fender close out panel mock up.jpg
    60.1 KB · Views: 2
  • smooth firewall fabrication and shaving off the wiper motor indent along the cowl header.jpg
    smooth firewall fabrication and shaving off the wiper motor indent along the cowl header.jpg
    23.5 KB · Views: 2
  • 1967 Coronet dissassembly_LI.jpg
    1967 Coronet dissassembly_LI.jpg
    143.2 KB · Views: 1
  • 318 V 8_LI.jpg
    318 V 8_LI.jpg
    394.5 KB · Views: 1
Joined
Sep 29, 2021
Messages
44
Reaction score
66
Location
Salisbury, Vermont
The right end of the cowl top turned out have been bashed in by a tree falling on it. They Bondo'd over it. So I cut out the bad spot and welded in new metal and body worked it back to perfection. The close out panels are mounted by slipping Allen head chrome bolts down through the surface and through nylon bushings as spacers leaving 1/4" space under them to hide wires. Neat trick...
If I decide to use stripes down over the side of the hood onto the fenders i'll also waterfall the stripes down into the engine bay and onto the close out panels.
 

Attachments

  • 171446-a00dafd2382af68c60a358841ec448fe.jpg
    171446-a00dafd2382af68c60a358841ec448fe.jpg
    61.9 KB · Views: 1
  • 726589-3b5da27928f35ca70eeba02e4e487fa2.jpg
    726589-3b5da27928f35ca70eeba02e4e487fa2.jpg
    20.8 KB · Views: 1
Joined
Sep 29, 2021
Messages
44
Reaction score
66
Location
Salisbury, Vermont
One of the three biggest modifications, the front end, the rear end & the interior, was a long detailed job. The Coronet dash and interior just didn't do it for me. I had always wanted to try installing a modern dash and interior into a 1960's muscle car. Seemed like a doable thing if I could find a modern car/truck dash and interior that would both work, and that I liked.
I took measurements of the space between the A pillars at the dash top and height of dash and depth of dash. Also from dash bottom to top of trans tunnel hump.
Armed with these numbers and a tape measure I spent the summer of 2015 traipsing all over several wrecking and salvage yards in NH, VT & NY states. I was unable to find anything that caused a buzz. Then one day I was talking to someone about foreign cars I had owned and spoke about a 1986 Audi 5000 Quattro sedan I had purchased from a West German dealership brand new in 1985. Great car! This got me to thinking about Audi's as I had always liked them for fit and finish. I poked around the internet looking at interiors from 2000-2006, these being what was likely to be in wrecking yards at the time. I liked the '02- '04 Audi A-6 dash and doors and console set up and remembered that there was one sitting in a yard near by. I went the next day and looked for it and found it sitting with doors closed, windows up and in an accessible spot. It was an 04 Audi A-6 Quattro All Road wagon and was dry and complete inside. I got out the tape measure and crossed my fingers for luck. The measurements were spot on! I had found my donor car.
I took it all, right down to the floor panel and the firewall. I also took the rear door panels.
Once I got it all back to my place I learned that the while the top of the dash was the right length the mounting pads of the aluminum SKELETON the dash mounts to was like 4" too short on each end. Drat!
So I had to devise a mounting plan for this thing because, come hell or high water, I was going to use the damn thing.
I ended up welding a couple of fabricated and angled 3/16" thick plates to the inside of each A pillar and bolting the dash skeleton to them. Works fine. The third mounting spot involves the frame that the brake pedal hangs from.
The Audi dash was deeper than needed and the windshield curve was much tighter. I cut away a lot of dash top at the front edge to match the Coronet windshield curve but still didn't impact the dash vents. It's still twice as deep as the stock dash was. lol. Many things came into play at once. The dash height, trans tunnel height and door to dash spacing all had to coincide so that the center tower of the console would mount up correctly and so that the door panel top sections would align with the dash ends when the door was closed.
Speaking of which, the Audi door panels wouldn't work as is, I ended up having to slice them up into separate sections and then further modding those so they would work with the big Dodge doors. The top section of the door panels ended up interfering with opening the wing windows so I modified them so that I could use the windows about half way open. A lot of thought and trial and error went into just those two doors where they align with the dash contours and the console tower connection. There's only one configuration that works and I had to find it. I had a full head of hair at the start of this project and am now bald. lol. But hey! It looks super trick in there!
Here's a snap of what the Audi interior looks like when assembled and ones of my fabrication.
 

Attachments

  • '04 Audi A6 dash and console, complete, installed in the 67 Coronet cab with Volvo buckets. - ...jpg
    '04 Audi A6 dash and console, complete, installed in the 67 Coronet cab with Volvo buckets. - ...jpg
    22.4 KB · Views: 2
  • '04 Audi Symphony Stereo, and climate control in the console tower - Copy.jpg
    '04 Audi Symphony Stereo, and climate control in the console tower - Copy.jpg
    24.4 KB · Views: 2
  • 216812-2190dea88a75e875fd2ca9fbb6185f83 - Copy.jpg
    216812-2190dea88a75e875fd2ca9fbb6185f83 - Copy.jpg
    62.2 KB · Views: 2
  • 216811-bfa4c09e9d15b51474b32a26b3896484 - Copy.jpg
    216811-bfa4c09e9d15b51474b32a26b3896484 - Copy.jpg
    59.8 KB · Views: 2
  • 2004 Audi A6 dash mock up in 67 Coronet cab showing heat and AC unit - Copy.jpg
    2004 Audi A6 dash mock up in 67 Coronet cab showing heat and AC unit - Copy.jpg
    24.3 KB · Views: 2
  • 216813-bd7cfebf608a0b063c9b13f42aaf2148 - Copy.jpg
    216813-bd7cfebf608a0b063c9b13f42aaf2148 - Copy.jpg
    31.6 KB · Views: 2
  • 0118191158a - Copy.jpg
    0118191158a - Copy.jpg
    76.4 KB · Views: 2
  • 0118191159 - Copy.jpg
    0118191159 - Copy.jpg
    90.1 KB · Views: 2
  • 0120200808a - Copy.jpg
    0120200808a - Copy.jpg
    48.7 KB · Views: 2
  • 0119200748b - Copy.jpg
    0119200748b - Copy.jpg
    94.2 KB · Views: 2
  • 0118201250a - Copy - Copy.jpg
    0118201250a - Copy - Copy.jpg
    82.1 KB · Views: 2
  • 0204201415 - Copy.jpg
    0204201415 - Copy.jpg
    80.7 KB · Views: 2
  • Audi dash body trimmed to fit 67 windshield curve. - Copy.jpg
    Audi dash body trimmed to fit 67 windshield curve. - Copy.jpg
    26.6 KB · Views: 2
  • example of an '04 Audi A6 interior complete - Copy.jpg
    example of an '04 Audi A6 interior complete - Copy.jpg
    26 KB · Views: 2
Joined
Sep 29, 2021
Messages
44
Reaction score
66
Location
Salisbury, Vermont
For this floor shift console, I wanted a short throw Pistol grip shifter. They are crazy expensive for an original so I decided to try to make one from scratch. I used 3/16" plate steel for the handle blank and white oak wood from a downed limb I found out in my woods. It took a couple of iterations before I got it dialed in for shape. I bent the handle angles to suit my hand and arm when sitting in the car. I ditched the plastic chrome bezel and used a square bottomed 4x4 rubber shift boot from the 86 Power Ram truck so now it looks like a 4 speed handle but it's an automatic. I bought a used Inland Shifter assembly and disassembled it to use the guts for the reverse lock out. It works by pushing down on a rod with the heel of my hand. The dash and console causes the shifter base to set rearwards from stock by about 9" so the connecting linkage rod will need to be lengthened. I used two left side parking brake cables for the center pull handle. The rotating armrest pad over top of the e brake handle houses four small analog engine and fuel gauges. The Audi dash gauges are pulse operated. I'll be using an adapter on the speedo cable so it will work. The bucket seats are 2006 Volvo XC-90 units with power lumbar, and ten positions as well as heat. real leather with "baseball " Stitching. I used a few other cars as inspiration for interior design and colors.
 

Attachments

  • 2020 Farrari GT Californis....jpg
    2020 Farrari GT Californis....jpg
    76.9 KB · Views: 1
  • 20210818_142748 - Copy.jpg
    20210818_142748 - Copy.jpg
    358.5 KB · Views: 1
  • 20210818_142813.jpg
    20210818_142813.jpg
    380.4 KB · Views: 0
  • 20210818_142823.jpg
    20210818_142823.jpg
    409 KB · Views: 0
  • 20210818_142856 - Copy.jpg
    20210818_142856 - Copy.jpg
    366.5 KB · Views: 0
  • 20210819_113628 - Copy.jpg
    20210819_113628 - Copy.jpg
    365.5 KB · Views: 0
  • 20210904_113239.jpg
    20210904_113239.jpg
    442.3 KB · Views: 0
  • 20210920_114133.jpg
    20210920_114133.jpg
    282.6 KB · Views: 0
  • WP_20161031_16_59_23_Pro.jpg
    WP_20161031_16_59_23_Pro.jpg
    191.2 KB · Views: 1
Joined
Sep 29, 2021
Messages
44
Reaction score
66
Location
Salisbury, Vermont
more of this
 

Attachments

  • 20210318_141804.jpg
    20210318_141804.jpg
    37.9 KB · Views: 1
  • 20210318_141717.jpg
    20210318_141717.jpg
    42.7 KB · Views: 1
  • 20210318_141712.jpg
    20210318_141712.jpg
    34.8 KB · Views: 1
  • 20210318_141634.jpg
    20210318_141634.jpg
    42.8 KB · Views: 1
  • 20210317_140531.jpg
    20210317_140531.jpg
    31.5 KB · Views: 1
  • 20210317_140526.jpg
    20210317_140526.jpg
    36.6 KB · Views: 1
  • 20210317_170115.jpg
    20210317_170115.jpg
    86.8 KB · Views: 1
  • 20210317_170129.jpg
    20210317_170129.jpg
    81.9 KB · Views: 1
  • 20210317_170203.jpg
    20210317_170203.jpg
    41.1 KB · Views: 1
  • 20210317_140510.jpg
    20210317_140510.jpg
    26.8 KB · Views: 1
  • 20210316_085712.jpg
    20210316_085712.jpg
    84.7 KB · Views: 1
Joined
Sep 29, 2021
Messages
44
Reaction score
66
Location
Salisbury, Vermont
Some pics from earlier in this tale that got missed...lol..the shots showing the bumper ends before sectioning, the door upper sections during fabrication and the Express pulled out onto driveway in 2018 to check the rolling status and steering.
 

Attachments

  • 604845-75795fc44bbf84ed4ebc9e3ffdba242f.jpg
    604845-75795fc44bbf84ed4ebc9e3ffdba242f.jpg
    20.4 KB · Views: 3
  • 604842-d1c34c87602fd33d4815bfe3f054d627.jpg
    604842-d1c34c87602fd33d4815bfe3f054d627.jpg
    18 KB · Views: 2
  • 604839-b6920d83668c0708a1ecb6890785f8d5.jpg
    604839-b6920d83668c0708a1ecb6890785f8d5.jpg
    24 KB · Views: 2
  • 0410201451.jpg
    0410201451.jpg
    380.3 KB · Views: 2
  • 0410201452.jpg
    0410201452.jpg
    440.1 KB · Views: 2
  • 0902181636d.jpg
    0902181636d.jpg
    77.3 KB · Views: 3
  • WP_20161106_13_38_27_Pro.jpg
    WP_20161106_13_38_27_Pro.jpg
    65.4 KB · Views: 3
Joined
Sep 29, 2021
Messages
44
Reaction score
66
Location
Salisbury, Vermont
Building the door panels became a challenge the more I got into it. The Audi doors are tiny compared to the Coronet slabs. The panels boosted a curved face that matched the dash end face but wouldn't work on the 67 doors. Too small. So I cut away each element of the Audi panel and ditched the curved background panel. I determined that I didn't really NEED the entire section that mated up against the dash end, I just needed to top half. The 67 doors are much longer than the Audi ones too so the Audi front door panel top section was too short. I had the rear door panels as well and the top section on them was much longer than the front doors so I took that section and sliced it in 2/3 and married it up with the front 1/3 of the front door top section to make one that went across the entire top of the 67 door. I fastened it to the 67 door frame with 4" drywall screws passing through plastic PVC tube sections that I cut to make the part stand off from the door at the right distance and angles to match the dash end. Once it was locked down I back filled the parts shell with spray construction expanding foam. The screwed down part kept the thing from moving because of the pressure from the foam expansion and in turn allowed the foam to expand into every nook and cranny. Once dry I trimmed it all and coated it with filler, sanded it down and it's ready to be covered with the vinyl. The top section houses the tweeter speaker for the Bose Symphony stereo system and the door pull latch. The latch being in the opposite corner now from stock had me building a rod system to cross the door diagonally so it would unlatch the closed door properly. I also had to make sure to miss the door glass and anything else inside the door like the window crank etc..
The other elements of the panel are the armrest/ switch housing/ door pull and the tilt out cubby that houses the electric seat memory buttons and a subwoofer speaker.
I laid a door out flat on my work table and played around for days with placement of each item on the door panel card, keeping in mind the way I wanted the upholstery to look and also ergonomics concerning where the seat sat in relation to the panel. Fortunately the deep dash caused the seats to have to be mounted rearward about 9" otherwise they would have been unworkable with the door panels.
The door cards needed to be able to be slid underneath the bottom edge of the top section so when I was applying filler there I mocked up a door card and upholstery section and applied the filler over top of that. Once done and removed the gap was left for later during upholstery.
The pull armrest part need some fabrication too as it had a curved base that matched the Audi panel I threw away. I ended up making a piece of white oak in a teardrop shape for the front end of the handle to land on and placed a metal panel, "shoe" behind the rear end where it curved up, it would be covered in vinyl later. The cubby at the bottom of the door card sits just below the window crank travel and just rearward of the door glass runner inside the door cavity at the windows front edge.
The arm rest houses the switch panel for the power windows and door locks. I had to figure out how to mount everything to the panel in order to be able to remove and replace the entire finished panel in one piece. I finally got it after much fooling around.
The wiring harness from the Audi had these little rubber pass through boots on the A pillars. Once I removed them I saw how they went together. It's a clever little plastic collar that snaps into the sheet metal and the rubber boot snaps over the collar. Cool German engineering. I transferred them to my A pillars and doors ,the Audi doors also had a set of lights that included one red and one white. Little rectangles that also snapped into the sheet metal. The white one sits under the door shell on the bottom facing downwards as a 'puddle ' light and the red one faces rearward on the door shell as a 'marker' light for when the door is open. I adapted the power lock mechanism to the Dodge latch as well. The door shells will get insulated and a dust seal plastic sheet overtop of them before the door cards go in.
 

Attachments

  • 808895-8a235ca0054b2422d828b61d4647fc75.jpg
    808895-8a235ca0054b2422d828b61d4647fc75.jpg
    21.3 KB · Views: 1
  • 808897-d3d377f56bf7e788aef0872fc3fb61d3.jpg
    808897-d3d377f56bf7e788aef0872fc3fb61d3.jpg
    22.6 KB · Views: 1
  • 808899-0ad4dba4fcbe35a387460906328a4d03.jpg
    808899-0ad4dba4fcbe35a387460906328a4d03.jpg
    25.8 KB · Views: 1
  • 808900-e92540b29dec2f98c740d1f4d28ef2f3.jpg
    808900-e92540b29dec2f98c740d1f4d28ef2f3.jpg
    30.5 KB · Views: 1
  • 20210910_152804.jpg
    20210910_152804.jpg
    258.8 KB · Views: 1
  • 811053-f2cf3d17b0f6b76cc7d1d95ee253099c.jpg
    811053-f2cf3d17b0f6b76cc7d1d95ee253099c.jpg
    27.4 KB · Views: 1
  • 811052-924a0dee0ce1738cacb5172436cdcf48.jpg
    811052-924a0dee0ce1738cacb5172436cdcf48.jpg
    29.8 KB · Views: 1
  • 0118201249_Burst01 - Copy.jpg
    0118201249_Burst01 - Copy.jpg
    76.2 KB · Views: 1
  • 0118201250a - Copy - Copy.jpg
    0118201250a - Copy - Copy.jpg
    82.1 KB · Views: 1
  • 0118201250a - Copy.jpg
    0118201250a - Copy.jpg
    82.1 KB · Views: 1
  • 0118201251 - Copy.jpg
    0118201251 - Copy.jpg
    52.8 KB · Views: 1
  • 0120200808.jpg
    0120200808.jpg
    76 KB · Views: 1
  • 0119201653a.jpg
    0119201653a.jpg
    95.1 KB · Views: 1
  • 0119200748b.jpg
    0119200748b.jpg
    94.2 KB · Views: 1
  • 0119200748b - Copy.jpg
    0119200748b - Copy.jpg
    94.2 KB · Views: 1
Joined
Sep 29, 2021
Messages
44
Reaction score
66
Location
Salisbury, Vermont
more door stuff...
 

Attachments

  • 0119200748b - Copy.jpg
    0119200748b - Copy.jpg
    94.2 KB · Views: 1
  • 0119201653a.jpg
    0119201653a.jpg
    95.1 KB · Views: 1
  • 0120201059a.jpg
    0120201059a.jpg
    86.4 KB · Views: 1
  • 0120200808b.jpg
    0120200808b.jpg
    76.7 KB · Views: 1
  • 0120200808a - Copy.jpg
    0120200808a - Copy.jpg
    48.7 KB · Views: 1
  • 0123201049.jpg
    0123201049.jpg
    78 KB · Views: 1
  • 0124200754.jpg
    0124200754.jpg
    42.9 KB · Views: 1
  • 0409201053a.jpg
    0409201053a.jpg
    82.3 KB · Views: 1
  • 0409201342a.jpg
    0409201342a.jpg
    42 KB · Views: 1
  • 0409201341c.jpg
    0409201341c.jpg
    69.4 KB · Views: 1
  • 0409201341.jpg
    0409201341.jpg
    50.6 KB · Views: 1
  • 1220181232b.jpg
    1220181232b.jpg
    39.9 KB · Views: 1
  • 1220191138a.jpg
    1220191138a.jpg
    67.1 KB · Views: 1
  • 1220191138b.jpg
    1220191138b.jpg
    51.1 KB · Views: 1
  • 1220191139.jpg
    1220191139.jpg
    57.6 KB · Views: 1
Joined
Sep 29, 2021
Messages
44
Reaction score
66
Location
Salisbury, Vermont
There are "roadster" type panels that begin just behind the bucket seat backs and go to the rear windshield. These came about because In my plans for the rear face of the car I would have a 1970 Road Runner rear bumper so the exhaust could exit through the round back up light holes in the bumper. In order to achieve this I needed the spare tire well removed from the trunk. With the well removed the gas tank hung out unprotected, plus, I was going to shave the fuel filler door as well. So, all of that meant that I now needed a place to store a spare tire. The rear seat area filled the bill but how to hide it? I futzed around with a few ideas before noticing a 1967 Plymouth Sport Fury rear seat topper for sale in the forum classifieds. It's out of another B Body so the width is right and they look like a set of wings. I wondered what they would look like if set up directly behind the FRONT seat backs. So I bought the piece and mocked it up....perfection! Worked like it was designed for the job. Once I had the positioning set right it was just an exercise in trimming and forming panels. Under those panels will be the spare tire, the battery box, fire extinguisher, and detailing supplies.
An added bonus is that the center trough of the panels is the same width as the contour lines in the deck lid and the hood, so, the lines flow all of the way through the car. They will be covered in vinyl.
 

Attachments

  • IMG_1668.jpg
    IMG_1668.jpg
    87.6 KB · Views: 2
  • 0628181204.jpg
    0628181204.jpg
    64.2 KB · Views: 2
  • IMG_1670.jpg
    IMG_1670.jpg
    65.4 KB · Views: 2
  • WP_20161029_12_52_27_Pro.jpg
    WP_20161029_12_52_27_Pro.jpg
    202.8 KB · Views: 2
  • WP_20161030_17_33_59_Pro.jpg
    WP_20161030_17_33_59_Pro.jpg
    91.6 KB · Views: 2
  • WP_20171114_15_34_06_Pro.jpg
    WP_20171114_15_34_06_Pro.jpg
    41.6 KB · Views: 2
  • WP_20171003_14_23_13_Pro.jpg
    WP_20171003_14_23_13_Pro.jpg
    72.7 KB · Views: 2
  • WP_20161030_17_35_16_Pro.jpg
    WP_20161030_17_35_16_Pro.jpg
    189.1 KB · Views: 2
Joined
Sep 29, 2021
Messages
44
Reaction score
66
Location
Salisbury, Vermont
There is a steel firewall panel across where the rear seat back would be to separate the cab form the trunk. I replaced the passenger side floor pan. The Audi center pull E Brake was a simple location and mounting drill. The cables are two left hand Coronet cables that meet in the middle. The forward ends extend into the cab through the front top of the transverse frame hump behind the front seats.
The fake side scoops always bothered me. I mean, why bother? So I thought that I would open them up. I simply sliced along the horizontal inlet lines and pushed the sheet metal in on a gentle curve. All that was left was to cut some tiny bits to fill in around the edges and some body work. They are closed out with black plastic covers faced with SS mesh.
 

Attachments

  • 228574-b1c3b17c05e01ca17df374173843793f.jpg
    228574-b1c3b17c05e01ca17df374173843793f.jpg
    24 KB · Views: 1
  • 20210910_152756.jpg
    20210910_152756.jpg
    320.2 KB · Views: 1
  • 20210920_114057.jpg
    20210920_114057.jpg
    269.3 KB · Views: 1
  • 20210925_124722.jpg
    20210925_124722.jpg
    237.8 KB · Views: 1
  • 20210925_155851.jpg
    20210925_155851.jpg
    271.2 KB · Views: 1
  • 20210925_155921.jpg
    20210925_155921.jpg
    263.7 KB · Views: 1
  • i15071.jpg
    i15071.jpg
    108.5 KB · Views: 1
Joined
Sep 29, 2021
Messages
44
Reaction score
66
Location
Salisbury, Vermont
I shaved the filler door. I never understood why Ma MOPAR thought it was a great idea to create beautiful Coke Bottle quarter panels and then slap a great ugly filler door right in the middle of all of that greatness. What a bad design cue. It had to go. Period.
I toyed with placing a 69 Charger style flip open cap on top of the quarter panel but it seemed too clunky and not trick enough. About this time I happened to watch an episode of Bitchin Rides where they hid the filler neck behind a 1953 Pontiac's rear quarter medallion and used the medallion as the pop up cap. So cool and way trick.
So I bought a weld in aluminum motorcycle pop up gas cap and placed on the quarter up next to the front left corner of the trunk lid. Smooth, hidden and trick, what's not to like? It looked wrong and for a few days I couldn't figure out why. Finally my pal Rick stopped by and saw the cap and said it was way cool. But, that I needed a second one on the OTHER side of the trunk lid for symmetry! THAT'S what was wrong. lol. So I got another one and placed it in a mirror position of the first. Now it looked right.
They both work and feed into a 17 gallon fuel cell from either side. The trunk is finished out with close out panels and carpet.
 

Attachments

  • 189373-16c94b770c67be1dfc50328d63cb3580.jpg
    189373-16c94b770c67be1dfc50328d63cb3580.jpg
    26.7 KB · Views: 1
  • 213589-4159a649cbe98be4f2c8bb4e86cc5fb6.jpg
    213589-4159a649cbe98be4f2c8bb4e86cc5fb6.jpg
    47.5 KB · Views: 1
  • 581875-169273dc470f56ecf5dad54e8118bd4c.jpg
    581875-169273dc470f56ecf5dad54e8118bd4c.jpg
    25.1 KB · Views: 1
  • 719622-179af218255fbf44378b00765d541151.jpg
    719622-179af218255fbf44378b00765d541151.jpg
    23 KB · Views: 1
  • 719624-6abec7f4f6c79589e6cef27e024c3397.jpg
    719624-6abec7f4f6c79589e6cef27e024c3397.jpg
    21.4 KB · Views: 1
  • 778358-d3ec7027d9e12b440c8acd5f4c99d1ae.jpg
    778358-d3ec7027d9e12b440c8acd5f4c99d1ae.jpg
    13.8 KB · Views: 1
  • 778355-2e6515c6bb7272c76e14a38e0ab3748b.jpg
    778355-2e6515c6bb7272c76e14a38e0ab3748b.jpg
    8.9 KB · Views: 1
  • 778354-b646f756a35eab1bc2cd1f1d3a329545.jpg
    778354-b646f756a35eab1bc2cd1f1d3a329545.jpg
    17 KB · Views: 1
  • 778350-f6d47bfa8d76d5c55ba546b5dc705c01.jpg
    778350-f6d47bfa8d76d5c55ba546b5dc705c01.jpg
    25.4 KB · Views: 1
  • 20210920_114020.jpg
    20210920_114020.jpg
    355.1 KB · Views: 1
  • 20211009_123036.jpg
    20211009_123036.jpg
    397.6 KB · Views: 1
  • 0607200935a.jpg
    0607200935a.jpg
    70.5 KB · Views: 1
  • 0607200934.jpg
    0607200934.jpg
    77.3 KB · Views: 1
  • 0606201240.jpg
    0606201240.jpg
    71.3 KB · Views: 1
  • 0606201148.jpg
    0606201148.jpg
    78.8 KB · Views: 1
Joined
Sep 29, 2021
Messages
44
Reaction score
66
Location
Salisbury, Vermont
The trunk lid is on gas filled lift rods and the mounts for them have a hole for the gas filler pipes to pass through the mounts. Trick.
I fabricated a flat trunk floor and welded it in over a new brace underneath. The brace holds up the full fuel cell and the exhaust hangers attach to the lower edge. The rear wheel wells are tubbed over to the frame sides. I used a Mancini Racing leaf spring relocation kit to achieve this. There is now 15 3/4" of tire space in each well. I had to add a second filler neck to the fuel cell too...lol.
 

Attachments

  • 1967 Coronet gas filler door shaved off.jpg
    1967 Coronet gas filler door shaved off.jpg
    13.8 KB · Views: 1
  • 289637-3adfbad777f3f7f1815034e5f0dbd037.jpg
    289637-3adfbad777f3f7f1815034e5f0dbd037.jpg
    20.1 KB · Views: 1
  • 289983-3ae41ebda1ca8097fe01f2d09e99028a.jpg
    289983-3ae41ebda1ca8097fe01f2d09e99028a.jpg
    22.2 KB · Views: 1
  • 0629201539b.jpg
    0629201539b.jpg
    73.3 KB · Views: 1
  • 0620191652.jpg
    0620191652.jpg
    53.6 KB · Views: 1
  • 289985-62165057b7e0656fe25266b46d0d79fe.jpg
    289985-62165057b7e0656fe25266b46d0d79fe.jpg
    22.3 KB · Views: 2
  • 0629201644.jpg
    0629201644.jpg
    74.3 KB · Views: 2
  • Mancini Racing leaf spring relocation kit installed.jpg
    Mancini Racing leaf spring relocation kit installed.jpg
    20.5 KB · Views: 2
  • tubbing the wells.jpg
    tubbing the wells.jpg
    25.9 KB · Views: 1
  • WP_20161024_16_07_42_Pro.jpg
    WP_20161024_16_07_42_Pro.jpg
    114.2 KB · Views: 1

Users who are viewing this thread

Top